Basic Structure of PyQt GUI program – a Step by step procedure with explanation of each line of code.
Writing a basic PyQt 5 GUI program involves several steps. PyQt 5 is a Python library for creating graphical user interfaces.
Here’s a step-by-step procedure to create a simple PyQt 5 GUI program:
Step 1: Install PyQt 5 Before you can start writing PyQt 5 code, you need to install PyQt 5 on your system if you haven’t already. You can install it using pip:
pip install PyQt5
Step 2: Import Necessary Modules In your Python script, start by importing the necessary modules from PyQt 5:
import sys from PyQt5.QtWidgets import QApplication, QMainWindow, QLabel, QPushButton
sys: This module provides access to some variables used or maintained by the interpreter and functions that interact with the interpreter.QApplication: This class manages the application’s control flow and main settings.QMainWindow: This is a class for creating a main application window.QLabel: This class is used to display text or images.QPushButton: This class is used to create a push button.
Step 3: Create the Application and Main Window Create an instance of the QApplication class to manage your GUI application. Then, create an instance of QMainWindow as your main window.
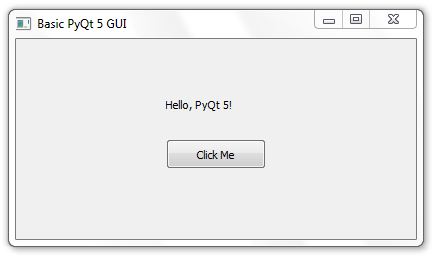
app = QApplication(sys.argv) window = QMainWindow() window.setGeometry(100, 100, 400, 200) # Set the window’s position and size window.setWindowTitle(“Basic PyQt 5 GUI”)
Step 4: Create Widgets Create the widgets (GUI controls) you want to display in your main window. In this example, we’ll create a label and a button:
label = QLabel(“Hello, PyQt 5!”, window) label.move(150, 50) # Set the label’s position button = QPushButton(“Click Me”, window) button.move(150, 100) # Set the button’s position
Step 5: Define Actions You can define actions for the widgets. For example, when the button is clicked, we want to show a message:
def on_button_click():
label.setText(“Button Clicked!”)
button.clicked.connect(on_button_click)
Step 6: Show the Main Window Finally, display the main window of your application using the show method and run the application’s event loop:
window.show()

sys.exit(app.exec_())
Step 7: Complete the Script Here’s the complete script:
import sys
from PyQt5.QtWidgets import QApplication, QMainWindow, QLabel, QPushButton

def on_button_click():
    label.setText("Button Clicked!")

app = QApplication(sys.argv)
window = QMainWindow()
window.setGeometry(100, 100, 400, 200)
window.setWindowTitle("Basic PyQt 5 GUI")

label = QLabel("Hello, PyQt 5!", window)
label.move(150, 50)

button = QPushButton("Click Me", window)
button.move(150, 100)
button.clicked.connect(on_button_click)

window.show()
sys.exit(app.exec_())
By using sys.exit(app.exec_()), you ensure that when the user closes the application’s main window or when you explicitly terminate the application, the script exits gracefully, releasing any allocated resources and closing the event loop.
In summary, sys.exit(app.exec_()) is a standard way to manage the application’s event loop and ensure a clean and controlled exit when the user decides to close the GUI application.
When you run this script, you should see a simple PyQt 5 GUI application with a label and a button. When you click the button, the label text will change to “Button Clicked!”.
This is a basic example to get you started. PyQt 5 is a powerful library with many features, so you can build more complex GUI applications by adding additional widgets and functionality as needed.
Some Example Program using Python PyQt GUI Programming:
- Python PyQt Convert Kilograms To Pounds
- Python PyQt Convert Pounds To Kilograms
- Python PyQt Find Factorial
- Python PyQt Add Two Numbers
![]()