Topic: Explain Python grid Geometry Manager with Example Code
The Python Grid Geometry Manager – GUI tkinter Module
The Grid geometry manager manages the widgets in the cells of a two dimentional table. The grid() method is used to place the widgets in cells of the grid in respective rows and columns.
label1.grid(row = 0, column = 0)
label2.grid(row = 1, column = 0)
Syntax of Python grid() Method
widget.grid( grid_options )
Explanation of different Options for tkinter grid() Method
The important options used in grid() method are as follows:
row : – It specifies the row numbe to place widget in. If not specified, by default it will arrange the widget in the first row that is still empty.
column : − the column option specifies the column number to have the widget.
For example, to place a widget in first row, second column that is in cell 0,1, the code is:
widget.grid(row=0, column=1)
There are some widgets which may span more than one cell. We can use the columnspan and rowspan options in such situations. The columnspan option is used to let a widget span more than one column, and the rowspan option lets it span more than one row.
columnspan − If a widget may occupy more than one columns use columnspan option. Its default value is 1.
rowspan − If a widget may occupy more than one rows, rowspan option tells how many rows a widget occupies. Its default value is 1.
padx, pady: They specify how many pixels to pad the widget, horizontally(padx) and vertically(pady), around (outside) widget’s borders with in cell.
ipadx, ipady − These options set how many pixels to pad widget, horizontally and vertically, inside widget’s borders.
ipadx: It specifies horizontal internal padding. The padding is added inside the widget borders.
ipady: It specifies vertical internal padding. The padding is added inside the widget borders.
sticky − By default, a widget is centered in a cell. But if the cell is larger than the widget, we can align the widget with sticky option. The value stiky=”W” will be used for aligning the widget to left. So the values for sticky option are N,E,S,W or their concatination combinations NE, NW, SE, and SW to state directions indicating the sides and corners of the cell.
Example:
label1.grid(row = 0, column = 0, sticky = W)
label2.grid(row = 1, column = 0, sticky = W)
For example, we wish to design the following layout in root window.
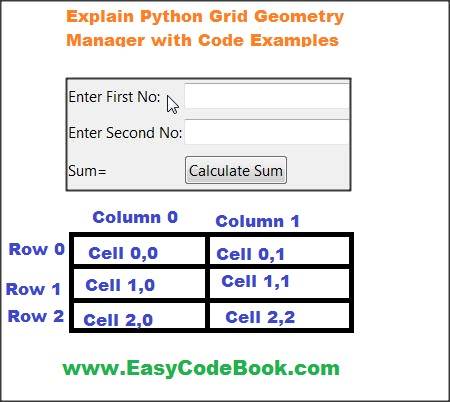
Arranging Widgets in Grid using grid() Method of tkinter Module
The given layout contains 6 widgets. We can place these widgets in 6 cells.
In this layout, we will use three rows of grid, row 0, row 1 and row 2. Similarly we will use two columns, column 0 and column 1.
We place the label1widget in row 0, column 0 that is in cell 0,0.
We place the entry1 widget in row 0, column 1 that is in cell 0,1.
We place the label2 widget in row 1, column 0 that is in cell 1,0.
We place the entry2 widget in row 1, column 1 that is in cell 1,1.
We place the label3 widget in in row 2, column 0 that is in cell 2,0.
We place the button1 widget in in row 2, column 1 that is in cell 2,1.
Actually the root window is split into a number of rows and columns, and each cell in the resulting table may contain a widget.
We can imagine the grid as a two dimentional table of rows and columns as shown in above image. For simplicity, the grid is of 3×2. It has 3 rows and two columns.
Complete Code using grid() method to design application GUI Layout
# import tkinter module
from tkinter import *


# create main tkinter window
window = Tk()

# set title of main tkinter window
window.title("tkinter grid")

# create three label widgets
l1 = Label(window, text = "Enter First No:")
l2 = Label(window, text = "Enter Second No:")
l3 = Label(window, text = "Sum=")

# create two entry widgets for user input
e1 = Entry(window)
e2 = Entry(window)

# create a button to be clicked for calculation
b1 = Button(window, text="Calculate Sum")

# Now use grid method to arrange labels
# in respective grid cells as required in GUI layout

l1.grid(row = 0, column = 0, sticky = W, pady = 5)
l2.grid(row = 1, column = 0, sticky = W, pady = 5)
l3.grid(row = 2, column = 0, sticky = W, pady = 5)

# Now use grid method to arrange entry widgets
# in respective grid cells as required in GUI layout

e1.grid(row = 0, column = 1, pady = 5)
e2.grid(row = 1, column = 1, pady = 5)

# Now use grid method to arrange button
# in respective grid cell as required in GUI layout

b1.grid(row = 2, column = 1, sticky = W, pady = 5)

# call mainloop() to start GUI of the program

mainloop()
GUI tkinter Output

Using grid() method of tkinter Grid Geometry Manager with example python 3 project
![]()
Pingback: Adding Menus to Python 3 tkinter GUI Programs | EasyCodeBook.com